Friday, April 7, 2023

Baby Girl Wrote a Book!

 Hi guys! Guess what? I wrote a book!!

It's called Mindful and it's available on Amazon and Kindle Unlimited. Mindful is a YA science fiction fantasy and the sequel is in the works right now!

In case you can't tell, I'm SO EXCITED!!!!!! 


Here's the synopsis:

Three girls. Three interwoven fates. One perilous story.

Ava, Vi, and R: Three different people, three different accidents, and one new piece of life-changing tech.

Ava can’t wait to drop her past life when she gets brought into the fantastical world of Mind Realm. After all, the life she left behind is nothing compared to what she can do now. But things aren’t going the way they’re supposed to. And then the timer starts.

Vi, however, feels trapped by Mind Realm. Everything reminds her of things she wants to forget, and it seems like this new world is pitted against her. Vi can’t tell what’s real and what’s fake. And now everyone she thought she could trust wants to kill her.

R can’t remember anything. This new mind-reading tech is just another weird piece in a broken puzzle. Struggling to pick up the remnants of her old life and trying to prove her strength to the other two girls, R feels hollow and invisible. Until a twenty-four-hour countdown begins ticking away. The countdown to greatness, because R is done hiding in the shadows.


What's your favorite genre to read?


Baby Girl

Friday, December 23, 2022

DIY Stuffed Animal NG/NJ Tube

Medical stuffies are becoming a big thing lately, and for good reason! Many people have medical devices that they need, and having a stuffed animal or doll that shares those devices helps them feel less alone! Unfortunately, these medical stuffies are still rather difficult to find, so here I have a quick tutorial on how to make your stuffed animal a DIY NG/NJ tube!

For people who don't know what those are, nasogastric/ nasojejunal tubes go directly to the stomach or jejunum for people who can't eat or digest food properly. These tubes go from the nose and down the esophagus to their destination to deliver food and nutrition.

Ok, now let's get making!


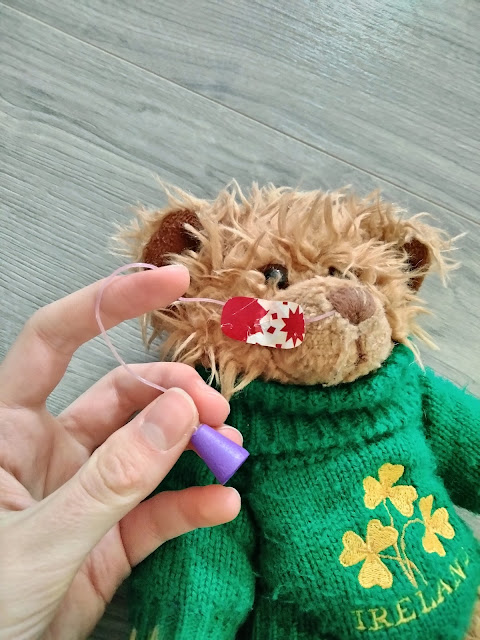
For the tube, you'll need a length of string (preferably thick, round string. Plastic friendship bracelet string is highly recommended), a triangular bead with a large hole (so you can fit the tip of a syringe into it), and some stickers or paper and double-sided tape. You'll also need glue; hot glue would work best.

To start, measure the string against your stuffed animal and cut it to a proper length. Measure from the nose, up the cheek, and then down to about the tip of the paw/hand for a good length. Add about an inch and then cut. To insert the tube into the nose, either find a seam near the nose, cut a small hole, or carefully insert the tip under the stitches if the nose is embroidered like my bear's is. Use thin tweezers to place the tube in the seam, slit, or under the embroidery. Tie a knot in the other end of the string and carefully glue it into the smaller end of the triangular bead. Look at the pictures for reference if you need to.

For tubie tape, you have a few options. You could simply stick the tube to the cheek with a sticker, or you could cut a rounded rectangle from paper and use double stick tape to attach it like I mentioned with the sticker. I used a wrapping paper scrap for festivity.


To "feed" your tubie pal, simply insert a syringe into the open end of the triangular bead. Don't put anything into the syringe! That would make a huge mess and most likely ruin your stuffie. 


Your tubie pal is done!
If you want more medical stuffie DIYs, drop a comment and let me know!

Baby Girl


Monday, June 20, 2022

Book Review: Rebel with a Donut

 SO sorry for not posting in FOREVER. I've been kind of busy and a little forgetful :)

Anyways, here's my latest book review: Rebel with a Donut by Chrissy Q Martin.


"Five teenagers and four senior citizens together in a retirement community. What could go wrong?

A contemporary Golden Girls meets The Breakfast ClubRebel with a Donut is a laugh-out-loud story about forging real friendships, breaking habits, discovering yourself, and finding your favorite donut."


"The characters are engaging and the plot isn't totally easy to guess" -Five star Amazon review

So. I'm getting back to it. Pardon me if this review doesn't measure up to my past ones.

First things first: this book is a great summer binge-read. It's best read huddled under the covers on those nights that are too hot to sleep (not exactly my own words, but I agree with whoever said them.) While Rebel with a Donut is the first book in a three-book series, you could just as easily read it without following through (but I do recommend finishing the series!).
I'm not typically a fan of sweet romances, and I did skip most of the romantic parts of this book, but overall it was a great read. It was a very clean book, with minimal mild swearing and just a few mentions of addiction.
The main character seems to actually be me, so it wasn't too hard for me to connect to the book. The premise of the book is that the main character goes to a retirement community to visit her grandma (and break her habit of following rules). Honestly, the most likeable characters were the grandmas. I don't want to spoil the book, though, so I won't say any more! If you're already interested, you should definitely read the book right now. You can find it here.
A basic conclusion of both my review and the book: the characters are real and relatable, the plot is simple but effective and oftentimes unexpected, and the turnout of the book wraps the whole story up in a neat little bow (even though there are more books that follow! You can find the second one here and the third one here.)

Thanks for reading! Hopefully you'll read the book now. I loved it, and I'm sure you will too! (If it's up your alley.)

Comment with suggestions of books you want me to review!

Baby Girl


Sunday, February 13, 2022

10 Great Valentine's Day Gifts

 Here's a little list of 10 Valentine's Day gifts that you can find or make (or a combination of the two). All links go directly to Amazon in case you need supplies or want to find a pattern I used.

1. Handmade Necklace Charm

Trace a little rectangle three times onto fabric (felt works best), cut them out, and then cut one rectangle in half (Discard one of the halves.). Sew decorations to the front of one piece for the front of the charm, then cut a rectangle of cardboard smaller than the felt rectangles. Now, make a sandwich in this order: short fabric piece, normal felt rectangle, cardboard, a piece of ribbon folded into a loop, and then the decorated rectangle. Sew around the edges of the fabric, being careful not to sew into the cardboard. When you're finished, it should be a sturdy charm with a loop for hanging and a pocket on the back for tucking a little note or picture into. (This idea came from the book Microcrafts.)


2. Handmade Infinity Bracelet

You can make the bracelet however you want, but to make the infinity, follow these directions: Cut a piece of wire, preferably thin wire and in a color you like, into a length between three to five inches, depending on what size you want the infinity. Guess where the middle is, then mentally split the wire into quarter lengths. Then, judging on the outside 1/4s, grasp somewhere closer to the center than the outermost quarter "lines" and fold it in on itself into a gentle, 180-degree curve. Twist the ends together like shown in the picture, then add to any bracelet however you like.


3. Handmade Wire Bracelet

Take a good long piece of wire and wind it around in a circle bigger than the wrist it's meant for. Take the ends of the wire and bend into a sharp angle, almost 180 degrees. Twist the end of one of the bends onto the long end of the wire to create a loop for the other end of the wire to clasp into. Thread beads and shank buttons onto the wire and let them slide around. Then, if you want to keep the various levels of wire together, wrap a thin red ribbon around the part of the bracelet farthest from the closure and tie knots at both ends. (I made my bracelet with an old guitar string.) 


4. Flowers
This is quite self-explanatory, but I have one caution: Never give someone cut flowers. Live flowers or fake flowers are good gifts because they can last literally forever. Cut flowers are a lovely gift if you want to give your friend or significant other something that has literally been dying since the stem was cut. A flower that will inevitably slowly die is not an optimal gift. A stuffed animal is a cute option, too.


5. Handmade Clay Animal
Foxes or other red animals are especially cute. Find directions online or in a book for the animal you want to make. I made a fox, which you can see below.


6. Heart locket
Find one online or in a store. Just make sure that's something they like...if you get someone a heart locket and they absolutely despise necklaces, that's not a prime situation for either of you.
Everybody needs to write stuff down. This is a seriously underrated gift. Give them a Valentine's themed notepad and a pack of pens or pencils. (Bonus points if those are Valentine's themed, too. But don't go overboard.)


8. Glitter Pencil
This one's pretty easy. Just take a pencil, preferably new, and paint it all over with glitter nail polish. Do this outside if you value your nose and your house's not-chemically smell. Let the polish dry, then sharpen the pencil or leave it unsharpened, whatever you want.


9. Mini Handmade Cards
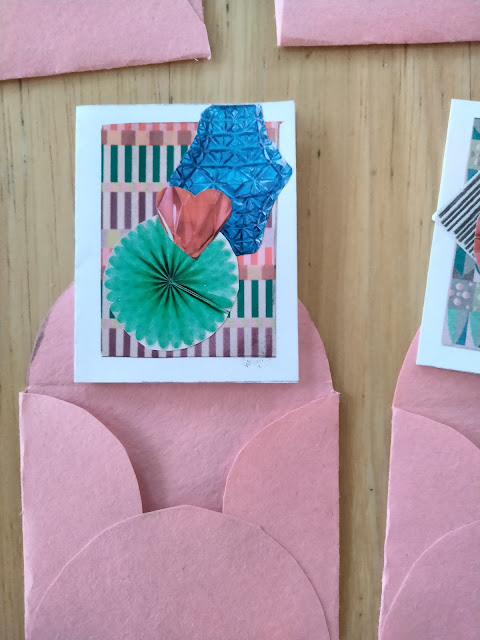
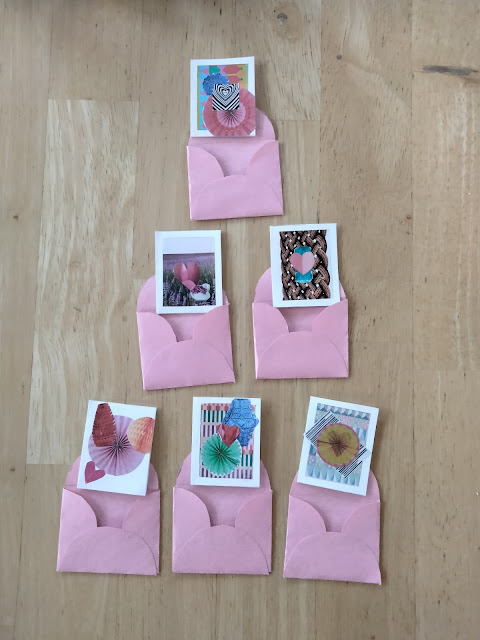
To start, you need to decide a size for the finished card. It can honestly be whatever you want. (To make an envelope, find a pattern online and scale to your card size.) To make the card, cut out a rectangle in the size you want height-wise and double the size you want widthwise. Fold the card in half to make it actually a card and not a postcard (you could do that instead, though). Measure 1/4 of an inch (about 6 mm) or so from the edges on the front to create a border. Paste a nice background paper in the border. Scrapbook paper works well, or old magazine clippings. Cut out some shapes for the foreground. Hearts work well (duh), as do balloons or things like that. You can also look at mine for ideas.
(This idea came from the book Microcrafts. Worth checking out!)


10. Handmade Mini Stuffed Animals
Who doesn't like stuffed animals? And if you made it yourself, it's even better. Find a small stuffed animal pattern online, trace it onto fabric (again, felt works best for small things because it doesn't fray), and cut out the pieces. Sew them together neatly, leaving a small gap. Stuff stuffing into the animal with a pencil and sew up the rest. Embroider facial features or draw them on with permanent or fabric markers. (The dog pattern also came from Microcrafts.)

Tell me what you made!

Baby Girl

Friday, June 25, 2021

Part-Time Vegan: The Diet That Saves the Planet and Won't Drive You Crazy

Part-time vegan is a real thing. Vegan diets, if you do it right, save the planet and can give you all the vitamins and other vital things you need. However, many people want to go vegan but simply don't have the time to research and plan what foods give them important vitamins and such but are also planet-safe. Let's face it: not all vegan alternatives save the planet. Some use palm oil that is grown in chopped-down rainforest land. Some vegan foods are planet-safe and give you a balanced diet, but you have to look.

In comes the part-time vegan diet. This diet is especially helpful for people who are lactose-intolerant or something else vegetarians eat but vegans don't. By weighing out meat and other animal products, you can eat without having to worry about ruining the planet or being a full-time vegan (kudos if you are, though. That's a big responsibility!).

The part-time vegan's diet might look something like this over a week (dinners only):

Sunday: First day of the week starts non-vegan. Dinner might include hard-boiled eggs, fish, water to drink, and a salad. Chocolate for dessert.

Monday: First vegan day of the week. Dinner might be a couscous bowl, almond milk to drink, celery for a vegetable, and vegan chocolate mousse for dessert.

Tuesday: Back to normal life (for un-vegan/vegetarians), or, possibly a vegetarian meal. Maybe bean and rice tacos with sour cream and cheese, a seltzer water to drink, plus some kale chips as the side? What about ice cream for dessert?

Wednesday: Vegan again. Try a tossed salad with kale, broccoli, carrots, lettuce, cabbage, homemade dressing, and crushed uncooked noodles. How about a glass of grape juice to drink? Vegan chocolate drops would make a good dessert. (Yes, I like chocolate!)

Thursday: Vegetarian again or normal diet. Possibly something like the picture above. A free-form salad with celery, lettuce, kale chips, olives, and cucumbers, or try some carrots or onions for variety. Maybe have a dinner roll on the side. Drink a tea with dinner. Have some Oreos or similar cookies for dessert.

Friday: Vegan, again. Try homemade vegan "tuna" salad for dinner. Drink water, maybe with some vegan protein or probiotic powder? Coconut macarons made with a vegan-friendly recipe make a good dessert.

Saturday: Free-form. Vegan, vegetarian, or normal diet, whichever you want.

So there you go. A model part-time vegan's week. Before we go, I want to give an example of an animal that eats like a vegan, because let's face it, humans are made to be omnivores. Vegan goes beyond what we're made to eat.

But did you know pandas do, too? Pandas are bears, as you probably know. But did you also know that pandas have teeth and a digestive tract suited for just and only meat, like all other bears? And what do they eat? Bamboo. Only bamboo. That's right. Pandas are meant to eat meat but their diet is primarily a singular plant. No wonder they spend so many hours a day eating and resting! They take longer to digest their meals.

Are you vegan, or were you inspired to try being a part-time vegan? Tell me!


Baby Girl

Saturday, June 19, 2021

Dashing Diva Gel Nail Strips Review

So this time I'm reviewing a product I recently tried with my mom. She was interested in gel nail strips that she'd heard about, so we got some at Walmart to try out.

The nail strips come in lines on plastic sheets so you can size them to your nail. The box we got had 34 strips, two of which were very large, most likely for toes. To apply the nails, you take the right size off the sheet, carefully line the bottom up just above your cuticle after cleaning all your nails, and press it down, exactly like a sticker. Once in position, you take the included file and rub in one direction to get rid of the excess material above the tip of your nail. The total process, for my mom and I to do all twenty of our fingernails separately, took about forty-five minutes.

Some things to point out would be that the strips are very long. VERY long. So long, in fact, that my mom and I cut our pinkie finger strips in half and used a half on each nail, and we still had excess on the ends. Also, the included file isn't too high-quality, so if you have a better one you might want to use it instead.

After application of the gel nails, it's recommended that you don't expose your hands to water or lotion for about an hour. We put them on around bedtime, so that wasn't too hard until we had to shower or such. The box says the nails last up to fourteen days.

The picture below is my gel nails after fifteen days. We removed them then. You can see if you look closely that the edges of the nails are starting to get ragged, and I also had my nail break under one the morning of day fifteen, so I needed to remove it to fix my nail. It should be noted that they peeled up a little at the edges a few times because I was crafting and working on a car (They held up good in that aspect) so when they peeled up I glued them back down with an Elmer's glue stick. It worked.
After removal of the gel strips, the nails were slightly pale, but were not smelly or sticky. Bonuses of the gel strips include no drying time, no chemicals that ruin your nose, and the fact that they didn't chip for neither my mom nor I during the fifteen days, as nail polish would.
The exact match of the gel strips we used is the Dashing Diva Gloss Gel Nail Strips from Walmart.

Other good ones to try might be:

Dashing Diva Gloss strips, galaxy-looking

Dashing Diva Gloss Asian style nail strips with gem accent nails

Tough Girls nail strips...SO many colors and styles I couldn't look at them all

Starry Night nail stickers (Some of the reviews are five stars and some are two stars, heads up, but they look cool)

Thanks for reading! Do you wear nail stickers? What kind do you use?


Baby Girl


Tuesday, May 25, 2021

Minecraft Mob Closeup: Foxes

Foxes are my favorite animal in Minecraft and one of my favorites in the real world! This post is about Minecraft ones, if you're wondering.

Minecraft foxes have ten health points (five hearts). They are passive but will attack a few creatures (other than the player, of course) if they are wild. If they are tamed, they will attack any mob that attacks the player. You can "use" leads and sweet berries on foxes; the latter makes the foxes breed, and the baby will trust you. In the upcoming update, they will also accept glow berries.

The fox in the picture below is fishing for salmon. Foxes will attack and kill salmon, tropical fish, cod, chickens, rabbits, and beached baby turtles.

Foxes have the special and funny/annoying ability to pick up anything on the ground. They prefer food items to anything else and will eventually eat the food unless it is cake. Guess they don't like frosted, baked goods. Foxes will happily spit out non-food items for food ones, so if one picks up your sword just toss some food on the ground. The funny thing is, when foxes eat the food in their mouths, they will be affected by the effects of the food. If it eats chorus fruit, it will teleport accordingly, if it eats rotten flesh it will get sick, and, likewise, if it eats a golden apple it will get absorption. If the fox picks up a weapon, it can wield it without taking a toll on the weapon's durability. Remember that if you get a good sword and a trusting fox. Foxes with totems of undying in their mouths will use the totem and get a second chance at life much like the player would. Foxes with a fire aspect sword that hit a mob in an extinguished campfire will relight the campfire and give a critical hit to the mob.

Foxes are hunted by wolves and polar bears alike. Even baby polar bears, which are passive, will attack foxes within sixteen blocks. If in a snowy biome or forest, you'll want to keep cute little foxy close.

Foxes like to sneak into villages at night and murder the villagers' chickens, so if you have a pet fox you might want to keep an eye on it while you trade. Foxes also tend to let out screeches at night.

Foxes are very sleepy, and during the day will sleep in places with a light level of less than fourteen. If a thunderstorm is occurring, however, they will be unable to sleep. Foxes have even been known to fall asleep in the middle of a walk on their leads. Also, foxes are scared of sleeping near armor stands, so they won't sleep within twelve blocks of one. If a wild fox is sleeping, you can sneak up to it without waking it up until you stand on an adjacent block. Foxes will not wake up unless they are exposed to light levels above fifteen.

Fortunately, foxes only drop 1-3 experience points as adults, so there's no use in killing them. You can even get more experience breeding them. Baby foxes, like other baby animals, drop no experience. Foxes will always drop whatever is currently in their mouths, and, say, not in their stomachs. (So if a fox ate your enchanted golden apple, too bad!)

Lastly, the most important part, foxes spawn in taiga, giant tree taiga, and snowy taiga biomes. The snowy taiga houses snowy foxes, which are just like red foxes but are colored white and have different favorite foods.


What other mobs do you want to see specialized posts on? Tell me!


Baby Girl